Kubernetes Pod ?

I'm deeply passionate about cloud computing and DevOps, driven by an insatiable curiosity to master cutting-edge technologies. From AWS to Docker, Kubernetes, Jenkins, Linux, Git, and Terraform, I thrive on exploring and pushing the boundaries of what's possible. Beyond the code, I believe in the power of collaboration and shared learning experiences. With each interaction, I cherish the opportunity to grow together and build meaningful connections. As I embark on this exciting journey, I'm eager to contribute my expertise and bring a human touch to the ever-evolving landscape of cloud and DevOps.
To better understand pods, let’s take the above example.
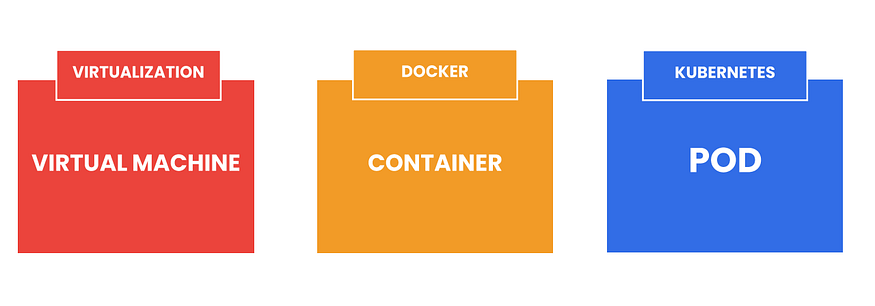
As we know, Kubernetes is a runtime environment for containers, but before Kubernetes, we have Virtualization and Docker.
When we wanted to deploy an application in virtualization technology, which will deploy the application on a Virtual machine, and in the case of docker, we have Container, where our actual application is running.
Similarly, Pods are the atomic unit on the Kubernetes platform where we deployed the application and run it.
What is a pod in Kubernetes?
Pods are the smallest deployable units in Kubernetes.
A pod is just a wrapper around the container.
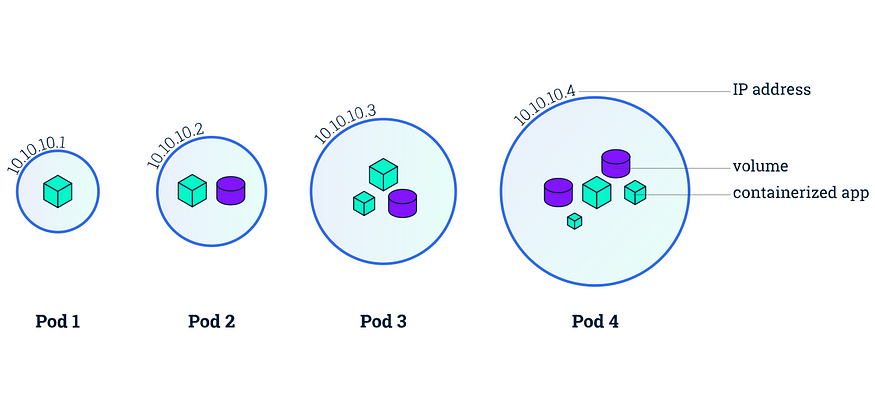
A Pod is a group of one or more containers, with shared storage and network resources and a unique IP address.
It contains one or more application containers that are relatively tightly coupled and use the shared volume.
A pod contains just a single container in a more common use case.
A Pod is not a process, but an environment for the running container(s).
Multi Containers Pod
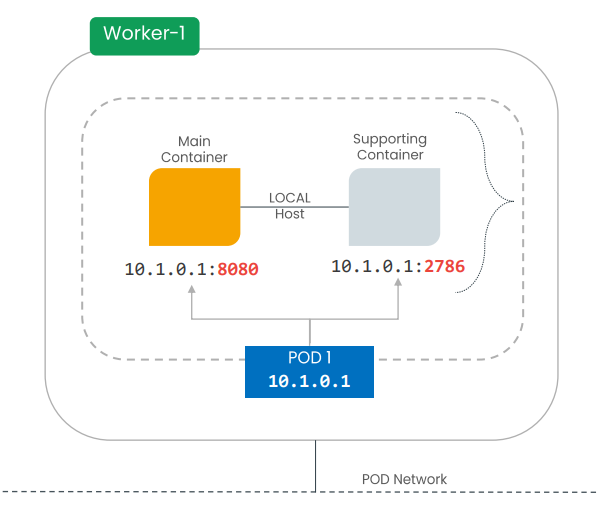
Let us take an example of the Kubernetes cluster, which consists of multiple worker nodes and we deploy our pods in the worker1 node.
Each time pod gets created, it will get a new IP address, which is unique for the entire port network.
In case of the pod dies for some reason, this will create a new pod with a similar configuration but with a new IP address on the same node or other healthy nodes.
Here the pod IP is 10.1.0.1, and contains one container that acts as a primary container and the other container that acts as a supporting, and this concept is called multi-container.
we can deploy multiple containers in a single pod and each container has the same network namespace.
Each container will have its own unique port number within that pod.
In this example, the main container has Port no 8080 and Another container, which is a supporting container, has 2786.
In case we want to access the primary container from inside the pod, then we need to use the Pod IP address and port of the main container.
Similarly, the supporting container can be accessed by Pod IP and port 2786.
Kubernetes is a powerful container orchestration platform that allows you to manage and deploy containerized applications at scale. To interact with Kubernetes, you often use YAML files to define the desired state of your resources, such as pods, services, and deployments. In this blog post, we will dissect a YAML file that creates a Kubernetes pod and explain each line of code step by step.
apiVersion: v1
kind: Pod
metadata:
  name: "mypod1"
apiVersion: v1: This line specifies the API version of the Kubernetes resource we are defining. In this case, we are using the "v1" version of the Kubernetes API.kind: Pod: Here, we define the kind of Kubernetes resource we want to create, which is a "Pod." Pods are the smallest deployable units in Kubernetes and can contain one or more containers.metadata:: Metadata is used to provide information about the resource, such as its name, labels, and annotations.name: "mypod1": This line specifies the name of the pod we are creating. In this case, the pod is named "mypod1."
spec:
  containers:
  - name: "myc1"
    image: "httpd"
spec:: The "spec" section defines the desired state of the pod.containers:: Inside the "spec" section, we define an array of containers that should run within the pod.- name: "myc1": This line specifies the name of the container within the pod. In this case, the container is named "myc1."image: "httpd": Here, we specify the Docker image to use for this container. In this example, we are using the "httpd" image, which is the official Apache HTTP Server image.


